How to Make a Book in InDesign
Creating a professionally designed book doesn’t have to be overwhelming—especially when you use Adobe InDesign, one of the industry’s leading layout tools. If you read my first blog post on how to design a book in InDesign, then you’ll want to catch up on part two of my series. Whether you're self-publishing a novel, compiling a photo book, or designing a corporate publication, InDesign offers the flexibility and precision needed to bring your vision to life. In this blog post, I’ll walk you through part two of my step-by-step process on how to make a book in InDesign that will help you create a polished, print-ready book. Keep in mind that this is a very basic overview. There are a lot of small intricacies that I’m not going to cover but may perhaps in a separate blog post(s).
VISUAL ELEMENTS
PHOTOGRAPHS
There are different types of visual elements you can include in your publication. The main elements are images such as photographs. InDesign is great for handling image layouts because it won’t slow down your computer. It’s designed for that. Once you’ve selected the image you’re going to use, perhaps done some editing in Photoshop, you’re now ready to import that image. It’s important to think about the image you have and whether it’s a vertical or horizontal image because you’ll want it to look right in your layout. You wouldn’t want to place a horizontal image inside a vertical frame or vice versa. Think about all the visual information you’ll be leaving out. So, keep this in mind when a) selecting your images and b) thinking about the placement of your images in your book.
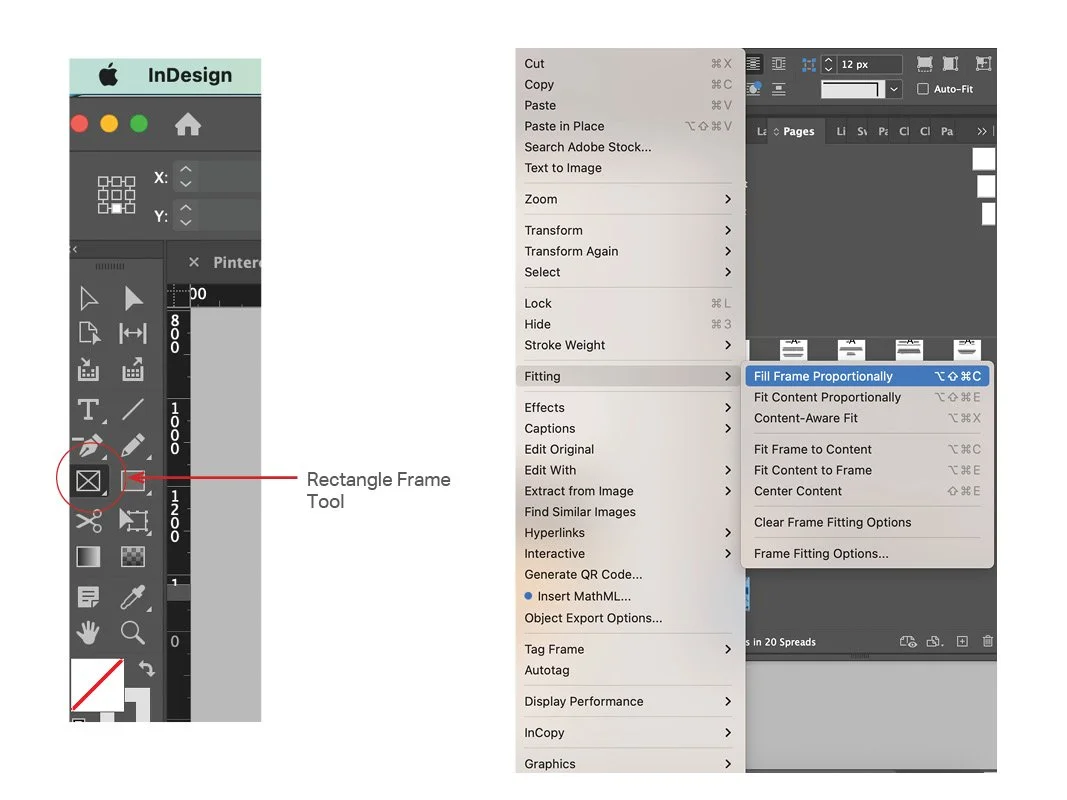
To place an image in InDesign:
Select the Rectangle Frame Tool.
Drag it across the page/column/grid where you want it to be.
Hit Command + D (on a Mac, Alt + D on a PC) to import the image you want
Once imported, hover over the image, right click and select Fitting> Fill Image Proportionally
Now this is the part that’s important. When you retouched/cropped/changed, etc. that image, you should have it set at 300 dpi in Photoshop. However, unless you cropped it to the exact size you’re wanting, once you hit “Fill Image Proportionally”, you’ve changed the Effective PPI. When you’re working with print, regardless of what the actual ppi says it is, you need your effective ppi to be at 300. Effective ppi is basically the resolution of that image after you scaled it in InDesign. So, make sure that effective ppi is correct or you could have some pixelated images once you go to print.
Another important thing to remember that when placing your images, if you’re going to place them right up to the border of your publication, you’ll want to extend it to the bleed line. This will avoid any fine lines at the border of your images.
PULL QUOTES
Another form of visual elements is pull quotes that you can use throughout your publication. These don’t require any effective ppi and they’re not images. Pull quotes are basically text taken from an article or chapter and formatted in such a way to make it stand out on a page. They could be shown as enlarged text such as the example below. They could also be framed in a box throughout your publication. Whichever style you choose, there is a way you can do this once and then hit that paragraph or object style to keep you from having to reformat it repeatedly.

Pull quotes shown as enlarged text.
To set up a pull quote as just enlarged text such as shown in the image above:
Create a text box and then select the text you want to show and type it in.
Select the font and font size that you’re wanting. If you have several lines of text, you can either set up the leading (the spacing between each line of text) by setting up a separate baseline grid. I wouldn’t recommend this for just a small sample of text. Instead, I would manually set up the leading in the text and then assign that a paragraph style.
Once you have your text ready with the desired font and size, set it up as a Paragraph Style. (If you don’t remember how to do this, check out my last blog post where I talk about how to set up paragraph styles.)
FRONT MATTER
When learning how to make a book in InDesign, keep in mind that every book has elements that make up what is called the front matter. Front matter is all the introductory materials that appear before the actual content of the book. Some front matter includes a title page, a dedication page, copyright page, forward (in some instances) and most importantly, your table of contents.
TABLE OF CONTENTS
You should already know the names of each of your chapters and they should be labeled as such within your book. The chapter names/titles should also have their own paragraph style assigned as this will make creating your table of contents much easier. Taking these assigned chapter titles along with their own paragraph style will allow InDesign to pull them, along with their page number, into the table of contents page where you can then format it. Contrary to what you may think, you do not have to type in the title of each page along with the page number manually. No. There is an easy way to do this.
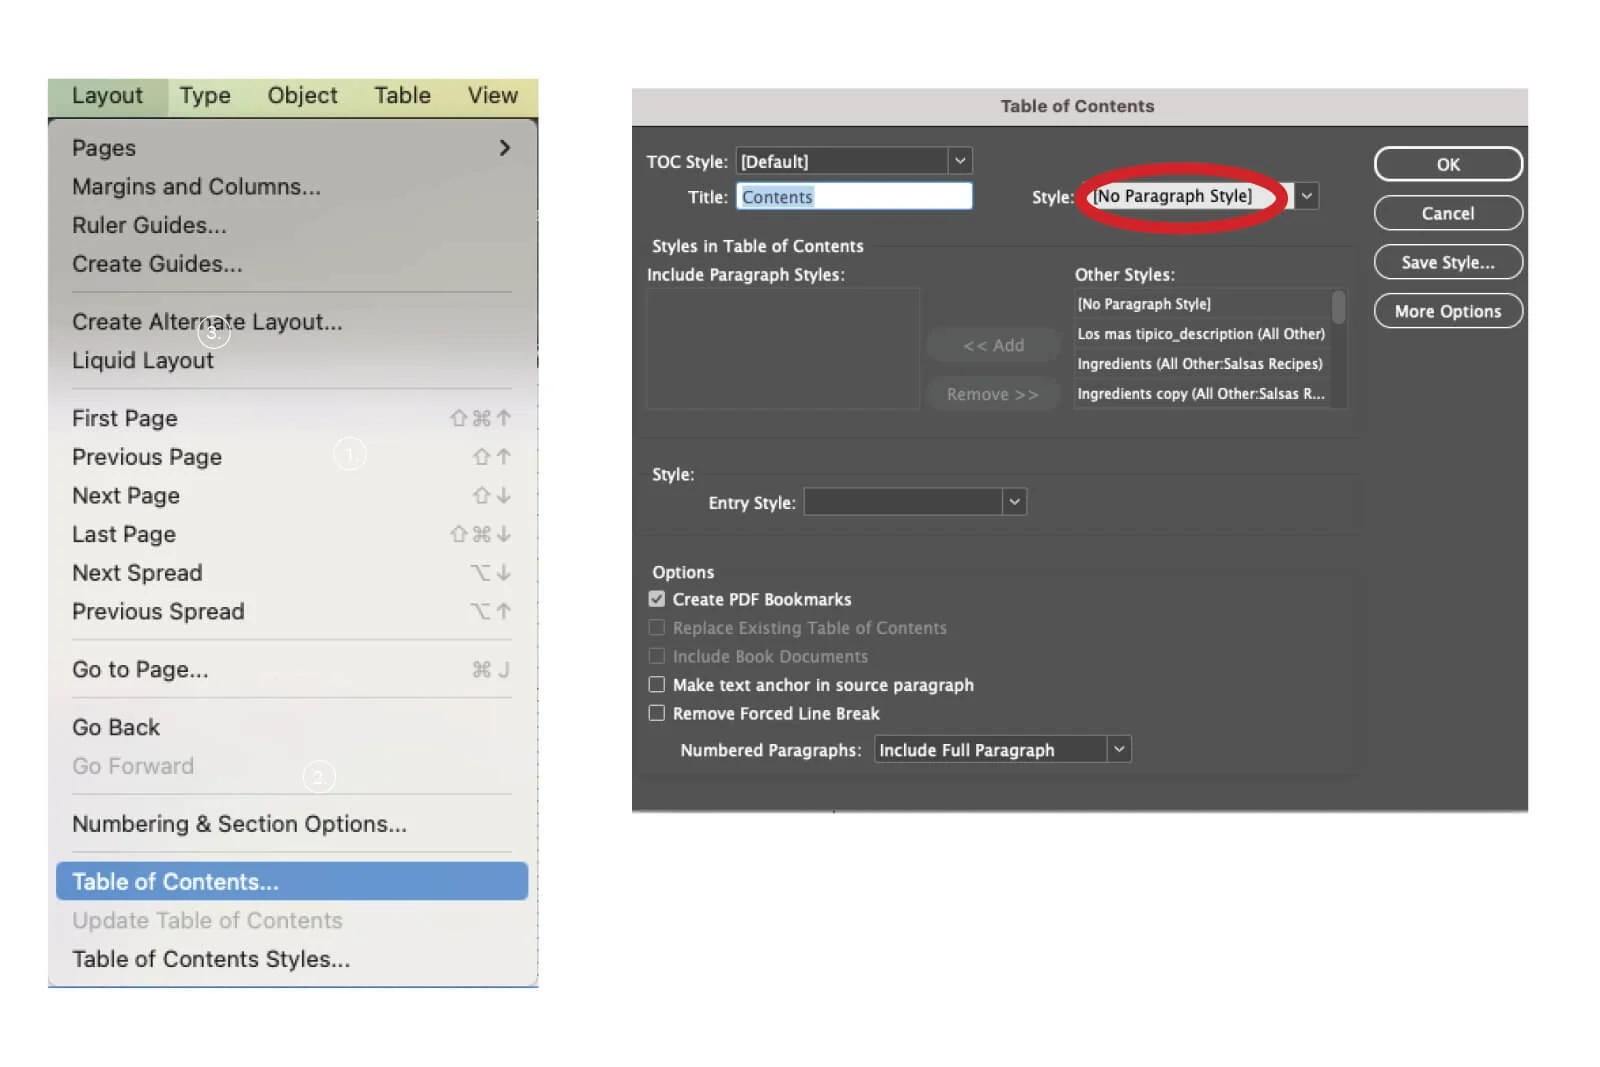
Go to the page of your book where you have set aside to place your table of contents.
Create a text box.
Go to Layout > Table of Contents
When that pop-up menu opens up, make sure you have Style: No Paragraph Style selected. You will style this later.
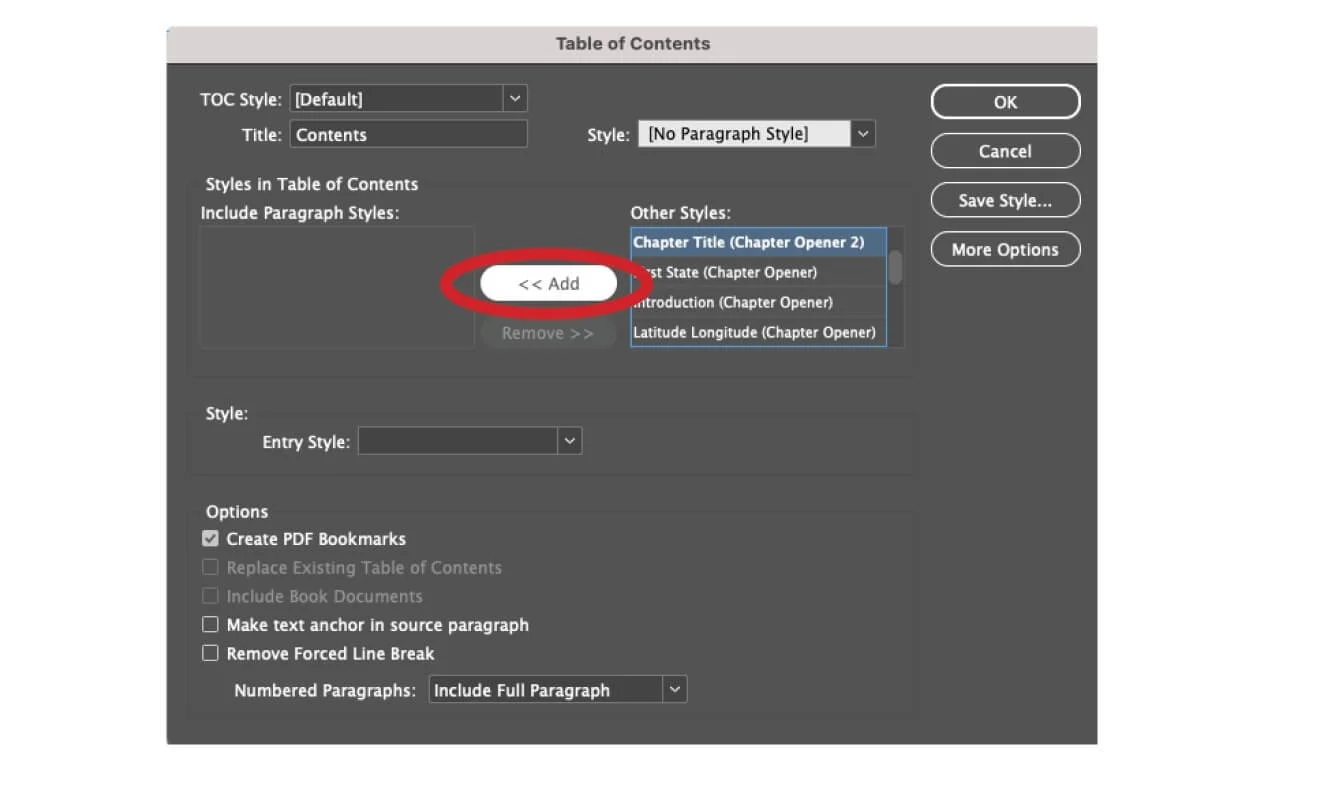
Where it says Other Styles, select the paragraph style that you assigned to your chapter title names.
Once you’ve found it, select “Add” and it will move it to the left-hand column.
Hit “Ok” and it will import all your chapter names/titles along with the page number where it is found. It’s going to import those titles and page numbers as they are styled in your paragraph styles.
Take that information and style your Table of Contents the way you would like to see it with the correct font and size.
Assign it a new paragraph style.
COPYRIGHT INFORMATION
You’ll want to have a page with all your copyright information and this page should also be set aside in your flatplan. The copyright page will always go on the left-hand side of your book and it should be before your table of contents and after your title page.
What is some important information this page should have? It should include the title of the book, the words “Copyright” with the copyright symbol ©, the year the book was published and the author’s name. You’ll want to include the ISBN number after this. You’ll want to have some text that explains the rights of the book. It’s also nice to have the name of the person that designed the book and/or the cover. You could add any other number of things but these are the basics.
Because this is informational copy and depending on how much of it you have, I usually set the font size to something just a tad smaller than my copy size. Anything between and eight and nine points is fine but again, do a test print to make sure. Eight to nine points looks very different in each font so make sure it’s not too small.
TITLE PAGE
This should also be included in your flatplan. It’s basically a repetition of the title on a full page. It usually goes on page one or page three of your book.
BACK MATTER
Just like the front, your book may have some elements that make up the back matter and are located, obviously, at the end of your book. Some of these elements include an appendix, a bibliography, an index, a glossary, and maybe an epilogue.
PREFLIGHT PANEL
Once you have all these elements squared away and you’re ready to print, it’s important to check your Preflight Panel located at the bottom of your screen in InDesign. This will tell you if your document has any errors such as a missing image or text.
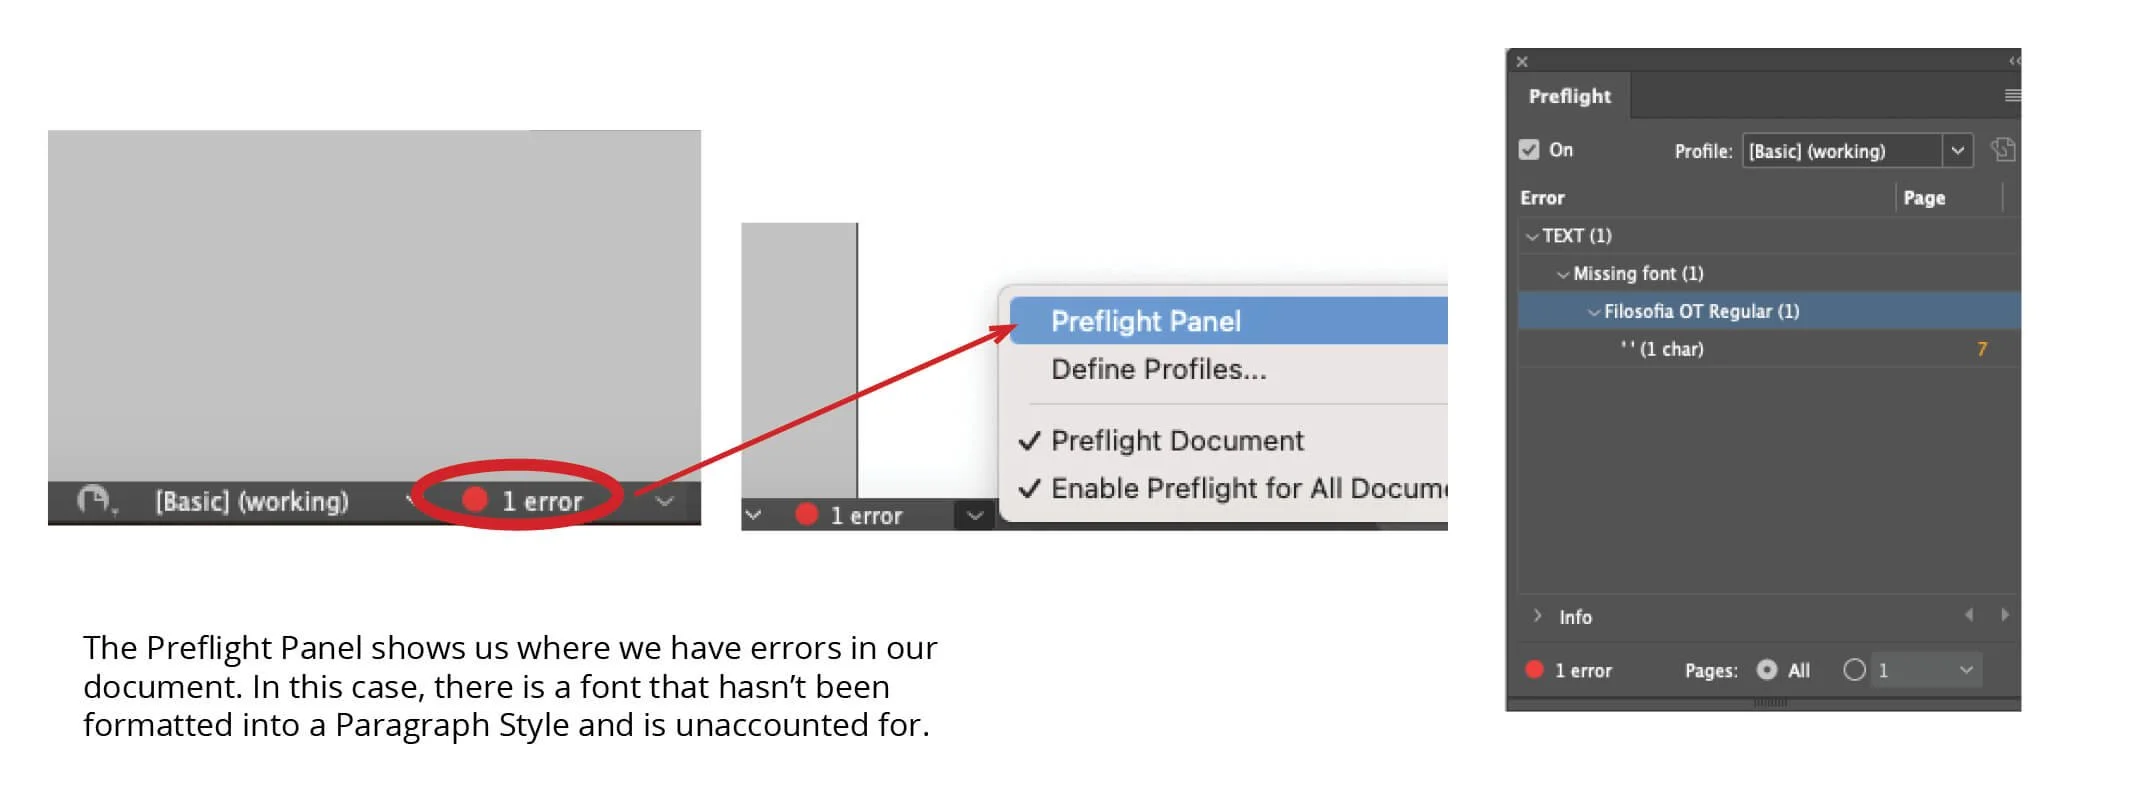
Go to the bottom of your screen in InDesign and click on the arrow right beside the error.
Once the pop-up menu opens, click on Preflight Panel.
Once that pop-up menu opens, InDesign will show you where you have errors. In the example below, it’s telling me that one of my characters is assigned a font that has not been styled. The yellow number is telling me on what page I can find the error.
From here, I click on that page number and it will take me to where the error is found.
The Preflight Panel is very useful in catching tiny errors. A lot of them are usually errors in text formatting. Another common error is perhaps your text box is cutting off some text that you haven’t realized. It will let you know where that error is as well.
EXPORT FOR PRINT
One of the important steps in knowing how to make a book in InDesign is knowing how to export it for print. The very first thing I usually do is see what my page count is. You should already have this ironed out in your flatplan, but design decisions may change along the way altering your layout a little bit. Maybe this means you added or subtracted pages from the final design. It’s important to remember that your final page count must be divisible by four. This is because individual pages of your book are printed on very large sheets that are imposed in a printing order and then folded and cut. The sheet size is very large and when folded, you will have eight pages, front and back. A half sheet size will have four pages, front and back. So to keep things safe, we make sure our total page count is divisible by four. If it’s not, I usually add a blank page at the front or back of the book. This is okay. If I’m three pages shy of making my total count divisible by four, I usually ask the client if there’s something they’d like to add at the front or back of the book. They could add any number of things if they’re not included in the original format. Perhaps they could add a prologue that is two pages long. This will leave me with just one blank sheet. Or they could add an author’s note at the back. Get creative, but whatever you decide, make sure the final page count is divisible by four.
When it’s time to send off to print, you’re going to create a PDF file and I usually give it a nomenclature such as Book Name_interiors. Because you will probably send this file along with the book cover layout, naming it interiors is helpful so that the printer will know exactly what part of the book they’ll be printing.
To print:
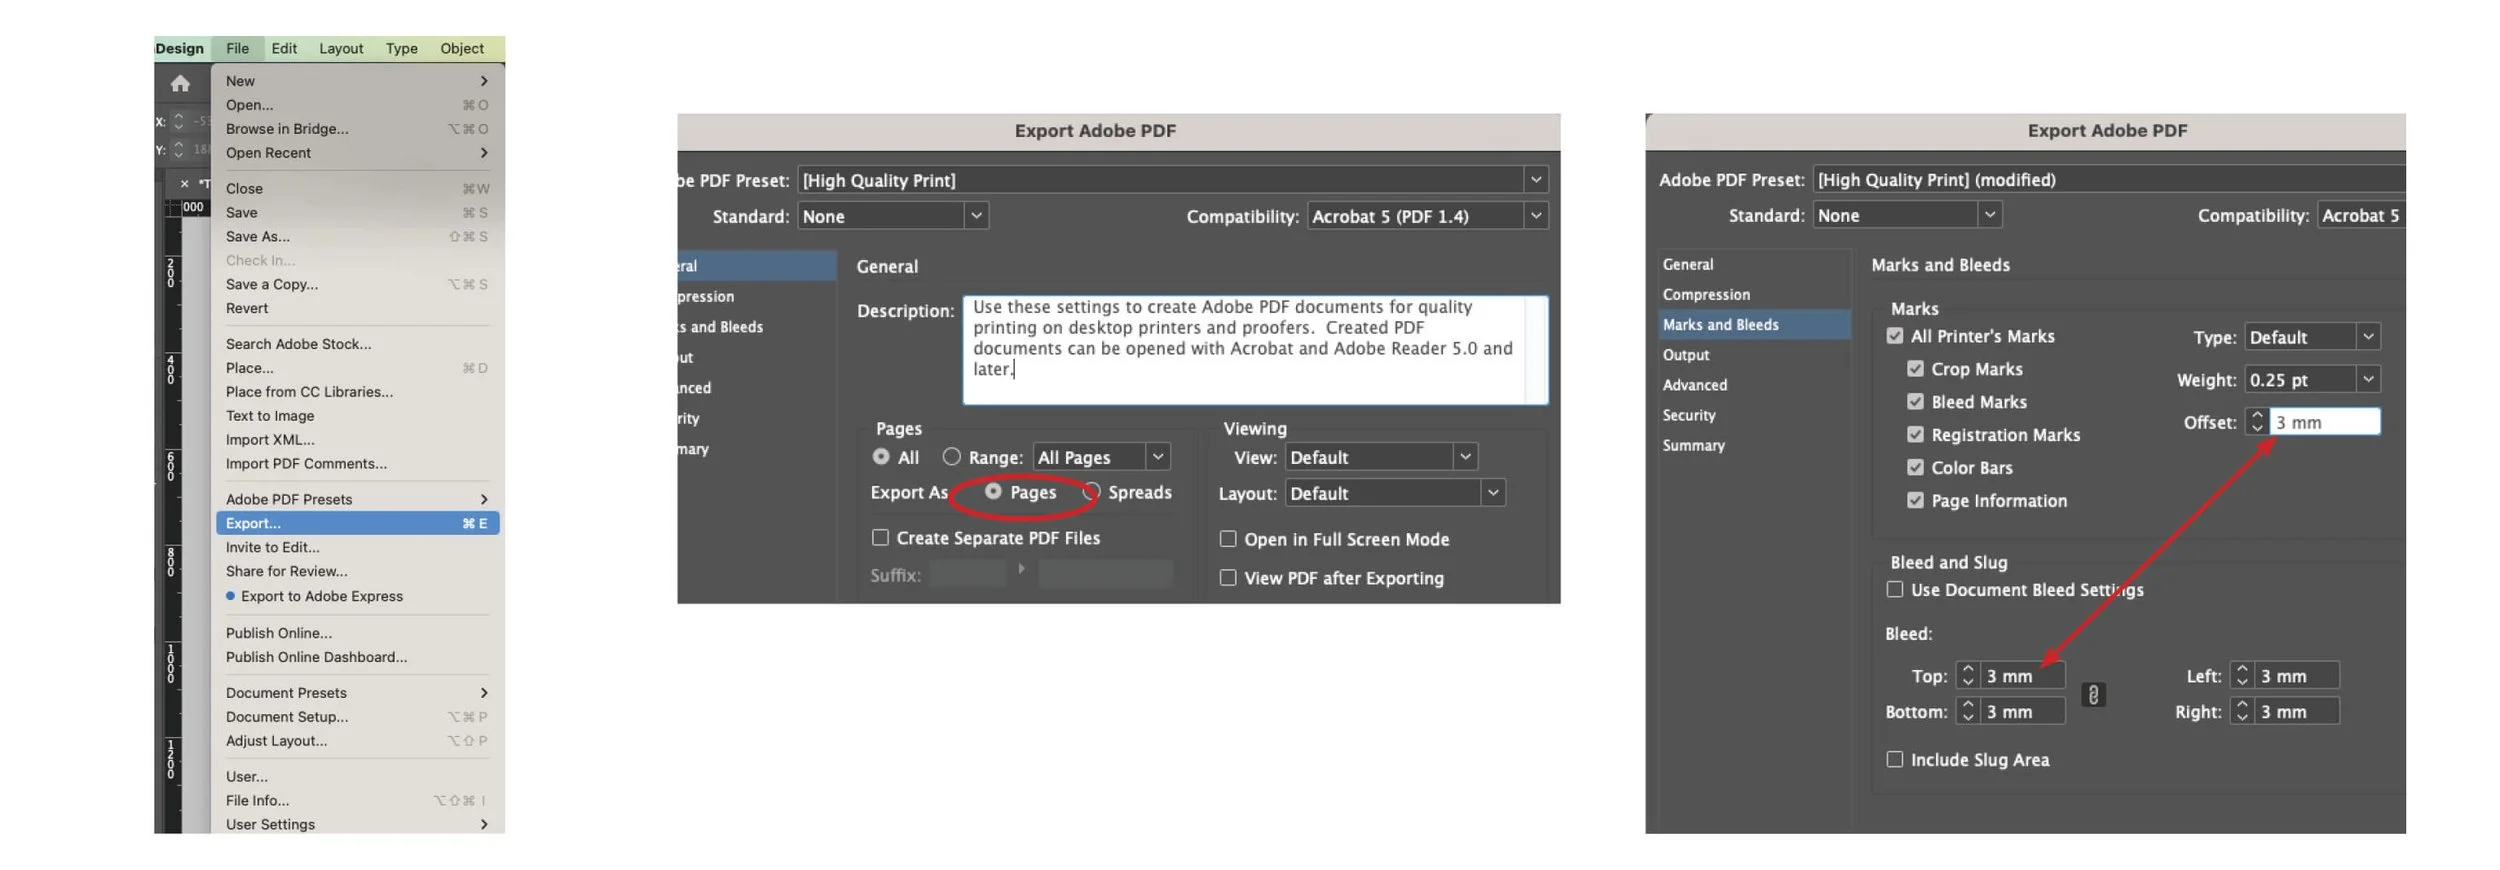
Go to File > Export
Select where you’ll be saving it in your file system and assign it a name.
Select Adobe PDF (Print)
Hit Save
Once you hit “Save”, a pop-up menu will appear. Make sure High-Quality Print is selected.
Under Pages, make sure you select All and Pages. Don’t select Spreads, even though that is what you have (a left- and right-hand facing page is called a spread). Why? Again, the printer will have to do some impositioning in pre-press and they need each page to be separate from each other. Don’t know what impositioning is? This article describes how a printer does imposition in pre-press to get the files ready for print.
Now go to Marks and Bleeds on the left-hand side of the pop-up screen.
You can select All Printer’s Marks if you’d like, though I find that much information unnecessary. I usually only select Crop Marks, Registration Marks and Page Information.
·Down where it says Bleed and Slugs, since I have already assigned a bleed to my book, I will select Use Document Bleed Settings.
An important thing to remember is that your Offset must match your Bleed Settings. Otherwise, you’re going to have two sets of bleed lines showing up and it could be confusing when it comes time to trim. So, if that number doesn’t match, go ahead and input the number that is showing on your Document Bleed Settings.
These are the very basic steps it takes in knowing how to make a book in InDesign. There are many, many more intricate steps involved that I might share in other blog posts, but once you’ve mastered these steps, you’ve got the technical part down. The creative part comes in knowing different types of layouts that will work well with your project.
If you’re laying out a simple book that is just type heavy, such as novels, you’ll find that it’s a pretty basic set up. But if you’re designing a book that has a lot of images, and reference materials such as a cookbook, a home décor book, a coffee table book, etc, then you’ll have to really think about your layout that will allow your book to flow. This is where knowing how to set up your columns will really come in handy.