How to Design a Book in Indesign܃ Part One
Have you ever wanted to publish your own book but were unsure in how to design it? Learning how to make a book in InDesign is the perfect place to start. When it comes to designing layouts for books and/or magazines, Adobe InDesign is a powerful tool that helps you create everything from simple novels to complex, image-rich coffee table books. In Part One of this blog post, I am going to share my very basic step-by-step process and I’ll walk you through how I make a book in InDesign. I’ll start with how to set up your document, columns and background grid. I’ll share how to set up Paragraph and Character Styles and why this is important. Part Two (coming later), I’ll talk about visual elements such as images and pull quotes. I’ll share how to put together your front and back matter, which includes items like your Table of Contents, copyright page, title page, etc. And I’ll also show you how to prepare your files for print. In the meantime, whether you're self-publishing or preparing a project for a client, mastering book creation in InDesign will open a world of possibilities.
SETTING UP YOUR DOCUMENT SIZE
Before setting up any files for design, it’s important to have a book flat plan. This will help you to understand how the book is going to flow and where you’re going to be placing your content. This is especially important for books that have images. You want your book to have a natural flow and having a flat plan will help you tremendously. Though I’m not going to cover how to do a flat plan in this post, you can reference the link to see how one is done.
Getting started can be overwhelming but the first place you must start is knowing the size of your book. So, what kind of book are you creating? Is it a novel? A cookbook? A sleek coffee table book? What I usually do is I like to hold several books in my hand from my personal collection to get a feel of what my potential book could look like. Do I like the way it feels? Is the size appropriate for my design? This concept mainly applies to books that are not your standard novel size such as coffee table books and whatnot. Once you’ve decided on what size looks good and you have your measurements, it’s time to set up your document. Keep in mind that this blog post is for print, not digital. Those are two completely different formats, so I’ll be covering how to do it for print.
Open InDesign and click on File > New > Document. Here is where you’ll want to enter in the trim size dimensions of your book. Trim size means that actual size of your book once it is trimmed at the printer (more on this below). You can set it up in inches or in millimeters, whatever works best for you. I like setting it up in millimeters because I feel it’s super accurate.
Make sure you select Facing Pages as your book will have a right- and left-hand side. Next, enter the number of pages you’ll need. You should have a page estimate based on your flat plan. Just remember that whatever number you decide on, it must be divisible by four. This is because in once it is ready for print, the pages are printed on very large sheets of paper and then cut and arranged accordingly. A whole sheet can be eight pages and a half sheet is four. So just to play it safe, make sure the total number of pages is divisible by four.

If you know the size that you want for your margins, you can go ahead and set those up at this stage. I like to wait until I’ve laid out a little bit of text and can see how it looks on the page before I set up my margins. This doesn’t have to be done right up front and can be fixed later before laying out too much text (I’ll show you how).
If you’re designing a book with any images or background colors that might run past the borders of your book, you’ll want to set up bleed. Bleed is set up to make sure that when your book is trimmed (to the final trim size you are wanting), the color extends past that trim mark and it will not leave a miniscule colorless border around that page. To set this up, enter 0.125 in (that’s 1/8”) or 3 mm if you’re working in millimeters, which is the standard dimension for bleed.

This book is an example of it having bleed. Since the background colors fill the entire page, the designer had to extend it beyond the border to avoid any colorless border. Taken from Pinterest, The Brightside Store.
SETTING UP PARENT PAGES
One of the important steps in knowing how to make a book in InDesign is setting up your Parent Pages. Every page in your book is set up with a Parent Page and each Parent Page has pertinent, repetitive information that is consistent throughout your book. This streamlines the process of you having to place something repeatedly. What are these elements? Things like your page numbers, your footer or headers.
To set up a set of Parent Pages (because you can set up many, this is especially true in magazine designs) go to the right-hand side of your menu and select Pages.
Click on either one of pages you see and you will open Parent Pages. Here is where I like to set up my background grid, margins, page numbers and any headers or footers.

An interesting thing to note about Parent Pages is that you can have as many as you want and assign it to specific pages. I designed a book recently where the author selected five different icons that he wanted on the top of every new page. So rather than having to insert an icon every single time, I created five different Parent Pages and placed an icon at the top of each one and then would assign Parent Page A to the first page, Parent Page B to the second and so on until I used all five and then started the process again. Putting each of the five icons on five different Parent Pages not only saved me having to paste it every single time I started a new page (there were 204 page in all), but it also assured me that the icon was appearing in the same location every time. That is the beauty of Parent Pages.
PAGE NUMBERS
To set up your page numbers, you must decide if you’re going to have it on both facing pages or just one. If you’re going to have it on just one page, you want to put it on the right-hand side.
In your Parent Pages, select the text tool and place the text box at the bottom of your right-hand page.
Next, select Type > Insert Special Character > Markers > Current Page Numbers. This will place a placeholder “A” in that text square. If you have your fonts selected for your page numbers, this is where you will format it. Simply highlight that “A”, select the font style and size you want and now your page number will appear on every page where you have assigned it Parent Page A.
Remember to center it where you want it to appear.

HEADERS/FOOTERS
To place a header or footer (such as the name of your book) in your design, you will repeat the same steps as above and place your text box where you want your header and/or footer to be. Style your text with the correct font and font size and remember to center it as well.
BACKGROUND GRIDS AND MARGINS
Next, you’ll want to set up your background grid so that you can get a feel of what your text is going to look like. I wrote a post on how to set up your background grid so if you’ll visit that, you’ll get all the details on how to do that. Once you’ve set up your background grid with the correct leading based on your font size, now is where you’ll want to try out some text to see exactly where you want your margins to be. InDesign has a default setting of ½” margins all around, but depending on how your background grid is set up, that last line of text might hit too close to that page number and everything will start to look too tight.
Go back to any page number in your regular layout (not the Parent Page) and layout some text with your footer and page numbers in place. Here you’ll be able to see how close that text is to your page number (if you’re placing it at the bottom). This is where you’ll make adjustments to your margins in your Parent Pages so that it’s carried throughout your layout.
Look at your copy and see how far it extends to the outside margins. Is it too close? You’ll need to adjust those. And it’s very important to remember the inside margins as well. Remember that your book will be bound and when you open those pages, you’ll want to be able to read the text that’s closest to those inside margins. If you don’t leave enough space, you’re going to lose some copy in there.
To adjust your margins, go to your Parent Pages (or Parent Page-A) and place your cursor over the text that says Parent Page-A. This will select both the right- and left-hand pages.
Next, select Layout > Margins and Columns. Once that fly out menu opens, you’ll see the option to change your margins. If you leave the lock on, whatever number you input will input it for all the margins and unless you want this (which you probably don’t), make sure you deselect the lock and input your margin numbers independently.

IMPORT AND STYLE YOUR TEXT
Once you have your margins established, now it’s time to place your text and assign paragraph styles to it. All your copy should be in a Word document because this is how you’re going to import it. To place your copy, find the page where you want to start. Select Cmd (on a Mac) / Ctrl (on a PC) + D and this will open a menu with your files. Select the Word document you’re going to use as your copy and select “Open”. This will load your copy (you’ll see it loaded within your cursor) to InDesign. Select where you want to place it, right click and voila! You have just placed your text into your InDesign file. Now we have to format it.
PARAGRAPH STYLES VS CHARACTER STYLES
One of the important elements in knowing how to make a book in Indesign is to understand what Paragraph and Character styles are. This part can be a little tricky if you don’t understand it, but it’s easy once you get the hang of it. Paragraph styles is a function used where you will assign a font to your paragraph whereas character styles, are assigned to the different styles within your fonts such as bold, semi-bold, italic, semi-bold italic, etc. So, let’s get started.
PARAGRAPH STYLES
To assign a paragraph style, go to your flyout menu option and select Paragraph Styles.
Click the “+” at the bottom and it will assign a new paragraph style called Paragraph Style 1.
Highlight it and right click and select “Edit Paragraph Style 1”.
A new menu will open and before you do anything, make sure Based On: [No Paragraph Style] is selected.
Next, select Basic Character Formats and here is where you will enter the font you want along with the size. Don’t worry about the leading since it will be based on the background grid that you already established a few steps back. Congratulations! You’ve just made your first paragraph style.
You’ll want to name this so that it doesn’t just appear as Paragraph Style 1. I usually name it something like “Text” or “First Paragraph”.


When designing a book that is text heavy, your first paragraph will look different from all the subsequent paragraphs thereafter and you’ll need to create a new paragraph style for those as well. For example, maybe your first paragraph doesn’t have an indent so all the subsequent paragraphs after that will. You’ll need to set up paragraph style for those. You will follow the same steps only in these paragraphs, you will need to set up where an indent starts. To do this, when you’re editing your paragraph style, you’ll want to select Indents & Spacing and give some spacing to your First Line Indent. Play around with it until you see a spacing you like. Make sure to have the Preview button selected at the bottom so that you can see your changes live.

CHARACTER STYLES
As I mentioned before, character styles are for items such as italic, bold, medium, semi-bold, etc. You’re going to set these up in almost the same format as you would a paragraph style except you’re not going to assign it a font.
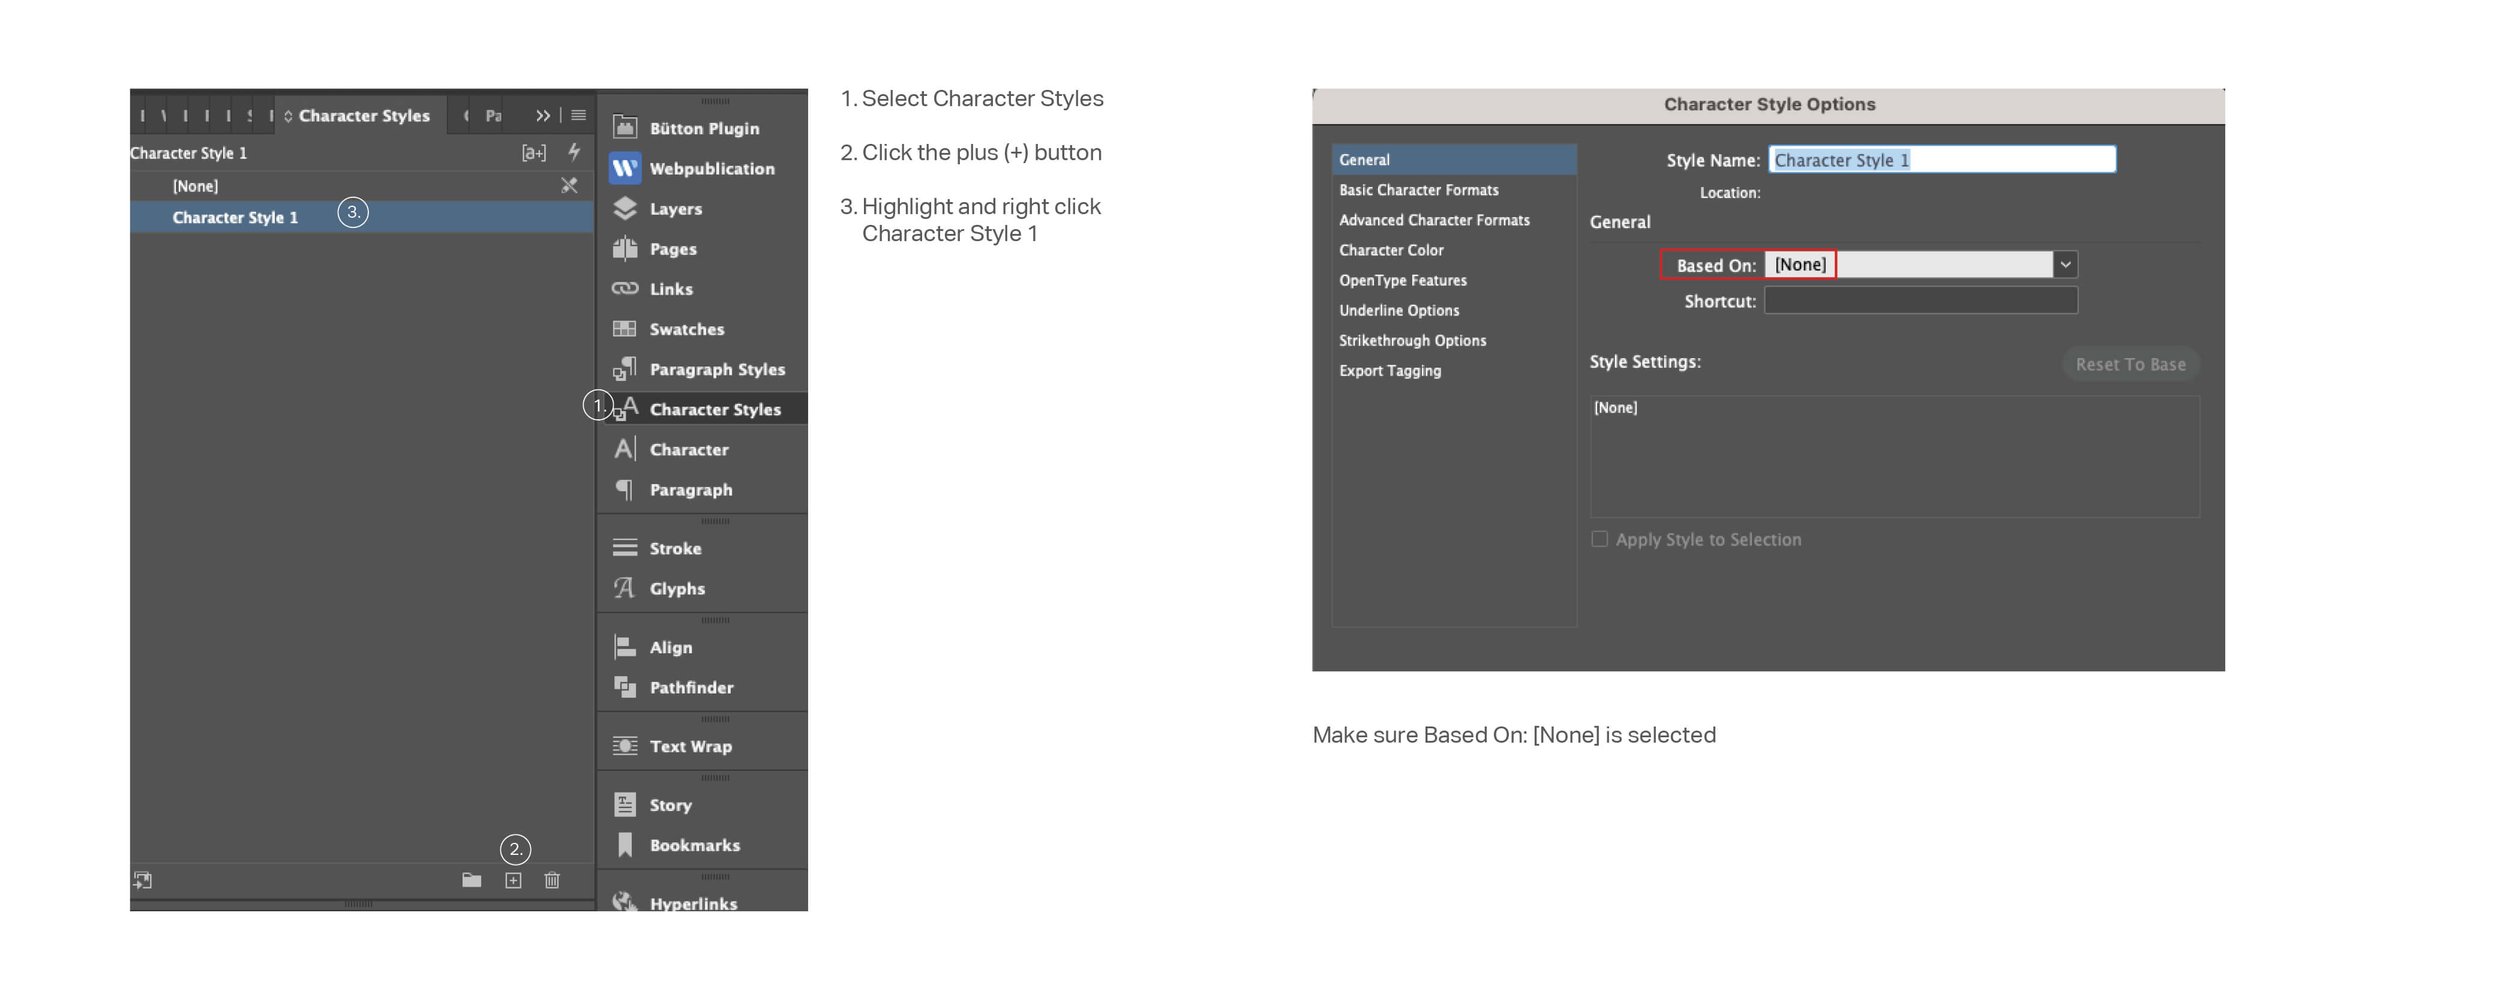
Go to your flyout menu and select Character Styles.
Click the “+” at the bottom and it will assign a new character style called Character Style 1.
Highlight it and right click and select “Edit Character Style 1”.
A new menu will open and before you do anything, make sure Based On: [None] is selected.
Select Basic Character Formats on the left-hand side.
Let’s set up an italic character style. In Style Name, type in Italic and under Font Style, select Italic from the dropdown menu. No need to select Font Family as you’re telling InDesign that any text that you’ve imported with an italic style to the font in Word, you’re now going to assign it an italic style font in the new font style you’ve selected in your Paragraph Style.
Click Ok and you’ve just created a character style for anything that is in italics!
Repeat this step for all the other character styles you may have in your text such as bold, semi-bold, etc.

ASSIGNING CHARACTER STYLES BEFORE FORMATTING PARAGRAPH STYLES
Once you’ve imported your text from Word, you’re now going to want to go through it and format all of you paragraphs to the correct font you’ve selected through Paragraph Styles. But before you do that, I assign my Character Styles FIRST. Why? Because if you assign an entire paragraph with a Paragraph Style and somewhere in there you have a word that is italicized or bolded, etc., InDesign will sometimes override it (it shouldn’t, but it can happen) and now you’ve lost that italicized word. You’ll have to go back to your Word document to double check it and long story short, you’ve just created more work for yourself. So, let me show you how I do this:
Hit Command + F. This will open up the Find Menu
Go down to your Find Format Option and hit the magnifying glass.
This will open a new fly-out menu and select Basic Character Formats located on the left-hand side.
InDesign knows what font your Word document imported so from the drop-down menu under Font Family, select the font of your Word document. In my case, it was written in Baskerville.
Select the font style of that font and hit Ok.
Next, go down to Change Format and hit that magnifying glass. Don’t go to anywhere on the left-hand side. Simply select Character Style from the menu and once that opens up all the options, select Italic. Now InDesign knows that wherever you have an italic style in your Word document, it will assign it an italic style in your new font.
Click Ok.
You will want to do this for every character style you have in your Word document for your InDesign file. Why is this important? Because the beauty of InDesign is that should you decide the font you initially selected isn’t the right one, you can change it in Paragraph Styles. This will then change it across the board and it will still respect those character styles regardless of what font you’ve selected. If you don’t do this, you will then find yourself going through your document and changing it manually. For example, say you selected Century Schoolbook as your font and you’ve set it up in your Paragraph Styles. Then, a little bit later, you’ve then decided that you like the look of Adobe Garamond better and you no longer want to use Century Schoolbook. You can easily change this in Paragraph Styles but guess what? That italic style will probably stay in the Century Schoolbook italic style and not switch to Adobe Garamond and now you’ll have to go back and change it manually. That’s a lot of work and you’re setting yourself up for potential errors.
So far, how are you feeling about learning how to make a book in Indesign? These are just the very basic steps. Stay tuned for Part Two where I go a little bit more in depth and share how I work with visual elements, pull quotes, front and back matter, and how to prepare your file for print.